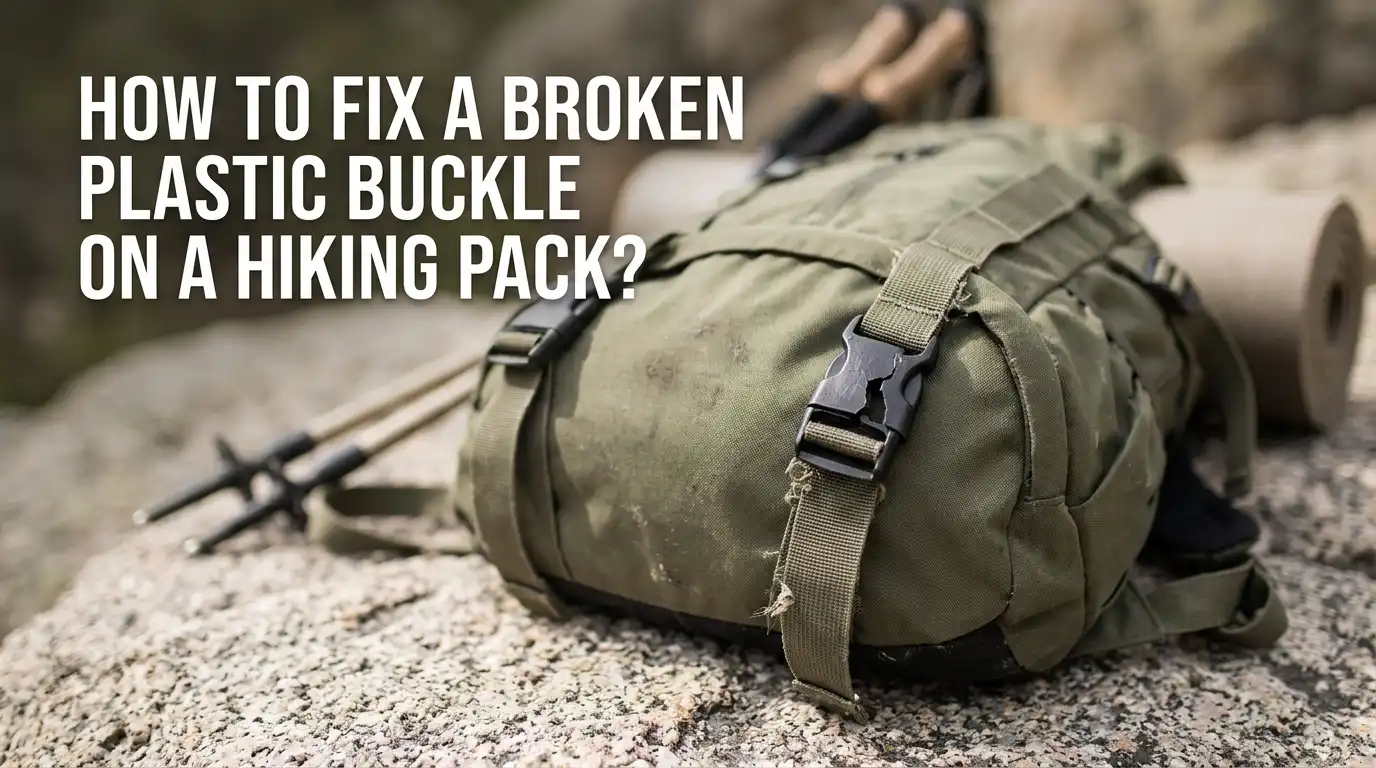
How to Fix a Broken Plastic Buckle on a Hiking Pack?
You are on day two of a beautiful multi-day hike. You bend down to tighten your hip belt after a snack break, and you hear a loud crack.
The plastic buckle on your hiking pack just snapped clean in half. Your heart sinks. A broken buckle can turn a comfortable pack into a useless sack of gear that bounces with every step.
I have been there. I have watched a waist belt buckle explode in freezing weather. I have seen a sternum strap clip crumble under tension miles from the nearest trailhead.
In a Nutshell:
- Always measure your webbing width first before buying any replacement. Buckle size is based on the interior slot width that the strap threads through, not the outside dimensions of the buckle body. Common hiking pack webbing sizes are 15 mm, 20 mm, 25 mm, and 38 mm.
- Carry a small repair kit on every trip. Pack at least two zip ties, a short length of duct tape wrapped around a trekking pole, and a spare side release buckle that matches your pack’s webbing. These three items together weigh less than an ounce and can fix 90 percent of buckle failures on the trail.
- Field repair buckles are the fastest permanent solution. These two-piece replacement buckles snap together around your existing sewn webbing loop. You do not need to cut any stitches or use any tools. The repair takes about 30 seconds.
- The sewing method gives you the strongest long-term fix but requires a seam ripper, needle, heavy polyester thread, and some patience. When done correctly, a sewn replacement matches the original factory strength.
- Super glue and zip ties are stopgaps, not permanent fixes. Use them to get home or finish your hike. Do not trust them for another full trip. Plastic adhesives fail under repeated tension and cold weather conditions.
- Match the buckle material to your use case. POM (polyoxymethylene) buckles offer high tensile strength. Nylon buckles perform better in freezing temperatures. If your original buckle shattered in cold weather, consider switching to nylon for the replacement.
Identifying Your Broken Buckle Type
Your hiking pack likely uses one of three main buckle types. Each one attaches to the webbing in a different way, and the repair method changes based on that attachment style. Look at your broken buckle closely before you start any fix.
The most common type is the side release buckle. You find these on hip belts, sternum straps, and compression straps. They have a male end with two prongs and a female end with a socket. You squeeze the prongs to release. When these break, it is usually one prong that snaps off or the center bar that cracks.
The second type is the ladder lock buckle or tension lock. These adjust strap length by gripping the webbing. You often see them on shoulder strap adjusters and load lifter straps. They do not click together like side release buckles. Instead, the webbing threads through a series of bars, and friction holds everything in place.
The third type is the tri-glide or slide buckle. These are simple three-bar adjusters that sit flat against the webbing. They let you pull a strap tighter or loosen it. They rarely break because they have no moving parts, but they can crack if stepped on or crushed.
Pros of identifying your buckle type before buying: You save money by not ordering the wrong part. You save time because you know exactly which repair method to use. You avoid frustration at the hardware store.
Cons of guessing: You might order a buckle that does not fit your webbing. You could waste an afternoon trying a no-sew fix on a buckle that requires sewing. You may end up needing a second repair sooner than expected.
How to Measure Your Webbing for a Correct Buckle Size
Measuring your webbing takes two minutes and prevents every sizing mistake. Ignore the outside width of your broken buckle. Buckle sizes always refer to the interior slot width where the strap passes through. A 25 mm buckle accepts 25 mm wide webbing.
Use a ruler or measuring tape to check the width of the nylon strap attached to the buckle. Most hiking packs use webbing between 15 mm and 38 mm. Hip belt buckles on larger packs commonly measure 38 mm or 1.5 inches. Sternum strap buckles are usually 20 mm or 25 mm. Compression strap buckles often measure 15 mm or 20 mm. Measure two or three strap locations on your pack because they may differ.
Write down each measurement with the buckle location. Keep a note on your phone. Next time you need a replacement, you can order the correct size from home without examining the pack.
Also note the thickness of your webbing. Some heavy-duty pack straps use thicker nylon that needs a buckle with extra interior clearance. A wide-mouth slide buckle design gives more room for thicker material to pass through smoothly.
Pros of measuring correctly: Your new buckle slides on without forcing it. The webbing adjusts freely. The buckle operates smoothly instead of binding.
Cons of skipping this step: You buy a buckle too small and cannot thread the strap through. You buy one too loose and the strap slips under load. You waste money and time on returns.
Method 1: The Quick Trail Fix with Zip Ties
This method works when you are miles from the trailhead and need to keep your pack functional for the rest of the day. You need two heavy-duty zip ties and the broken buckle pieces. Zip ties are a lightweight and adaptable solution for fixing broken gear in the backcountry.
First, reconnect the broken male and female buckle ends as best you can. If one prong snapped off a side release buckle, align the remaining prong in the socket. Thread one zip tie around the outside of the female buckle housing. Cinch it tight so the broken male prong stays pressed into the socket. Add a second zip tie running perpendicular to the first one for extra security.
For a ladder lock that cracked, wrap a zip tie around the entire buckle body and webbing assembly to hold the strap at the correct tension. Trim the zip tie tails with your multi-tool or nail clippers so they do not snag on branches.
This fix creates a semi-rigid connection. You can release the buckle by popping the zip ties open with a knife later, but do not plan on using the buckle normally for the rest of the trip. This is a get-home solution.
Pros: Extremely fast to execute, requires no sewing or glue, works with almost any buckle type, zip ties weigh almost nothing in your repair kit.
Cons: Zip ties can snap under heavy load, the fix feels bulky against your body, you cannot easily adjust strap length, and sharp trimmed zip tie edges may scratch your skin or clothes.
Method 2: Duct Tape Emergency Repair
Duct tape sits in almost every backpacker repair kit. It works as a temporary buckle fix when you have nothing else. You need a strip of tape about six inches long and the two broken buckle halves.
Align the broken pieces as closely as possible. Wrap the tape tightly around the joined area in a figure-eight pattern. Press each layer down firmly to maximize the adhesive contact. For a side release buckle, wrap tape around both the socket housing and the inserted prong section. For a ladder lock, tape the buckle directly to the webbing at the correct position so the strap does not slip.
The tape provides compression that holds plastic fragments together and also adds some structural reinforcement. You can layer more tape every few hours if the first layer starts to peel. In cold or wet conditions, the adhesive may weaken, so check the fix whenever you stop for water.
Pros: Duct tape is already in most hiker repair kits, the application takes under a minute, it works in rain if you dry the surface first, and you can apply it without removing the pack.
Cons: The adhesive leaves a sticky residue on your webbing, the fix loosens with body heat and movement, you cannot release the buckle without cutting the tape, and it looks messy on an otherwise nice pack.
Method 3: Field Repair Buckle (Snap-On Replacement)
This is my favorite solution, especially for sewn-in buckle loops that you cannot easily unthread. A field repair buckle is a two-piece replacement that snaps together around your existing webbing without cutting any stitches.
Remove the broken buckle entirely by cutting or snapping off the remaining plastic. Save the webbing loop. Open the two halves of the field repair buckle. Position one half behind the sewn webbing loop and one half in front. Press them together until they click into place. Thread the webbing through the new buckle just as the original was arranged.
Some field repair buckles use small screws to lock the halves together. Others use a snap-fit design. Both styles create a permanent repair that matches the strength of the original factory buckle. You can find these in side release, ladder lock, and tri-glide configurations.
This repair takes about 30 seconds. You do not need scissors, needles, thread, or glue. It works perfectly for hip belts, sternum straps, and any buckle location where the webbing is sewn into a closed loop.
Pros: No sewing required, no tools needed, repair takes seconds, the result is as strong as the original buckle, and the replacement looks clean and professional.
Cons: You must buy the exact size and style ahead of time, field repair buckles cost slightly more than standard buckles, and you cannot find them at every outdoor store.
Method 4: Adhesive Bonding with Super Glue and Baking Soda
This method works for a clean break across a plastic buckle where both fragments fit together perfectly like puzzle pieces. You need cyanoacrylate super glue and a pinch of baking soda, which acts as an accelerant and filler.
Clean both broken surfaces with rubbing alcohol and let them dry completely. Apply a thin layer of super glue to one broken edge. Press the pieces together and hold steady for 60 seconds. While the glue is still tacky, sprinkle a small amount of baking soda over the joint. The baking soda reacts instantly with the super glue, creating a hard, cement-like bond.
Add a second light layer of glue over the baking soda and let it cure for at least 15 minutes before putting any load on the buckle. This creates a repair that is harder than the original plastic but also more brittle. It works best on thick buckle bodies where the glued surface area is large.
Do not use this method for a prong on a side release buckle. The prong flexes every time you clip and unclip, and the glued joint will snap at the worst moment. Reserve adhesive bonding for stationary parts like the center bar of a tri-glide or the body of a ladder lock.
Pros: The materials are cheap and widely available, the repair cures in minutes, the baking soda trick creates a surprisingly hard fill, and the fix adds almost no bulk.
Cons: The bond is brittle and cracks under flex stress, super glue does not bond well to all plastic types, the repair fails suddenly without warning, and you cannot trust this fix for load-bearing buckles like hip belts.
Method 5: The No-Sew Webbing Thread Replacement
This method works when your broken buckle attaches to webbing that you can unthread from a simple folded strap. Many backpack straps have a single fold with a bartack stitch at the end. If the buckle was not sewn in place, you can replace it without touching a needle.
Slide the broken buckle off the webbing by pulling the strap backward through the buckle slots. If the strap end is frayed or too thick to pull through, trim a tiny amount with scissors and singe the cut end with a lighter to prevent unraveling. Thread the new buckle onto the webbing, following the exact same path the old buckle used.
For a side release buckle, thread the webbing through the largest slot first, then back through the smaller tension slot. Pull the strap tight and feed the tail through the elastic keeper loop if your pack has one. The whole process takes about five minutes.
This method works best on compression straps, side accessory straps, and some sternum straps. It does not work on hip belt buckles or load-bearing shoulder straps that are sewn into the pack body.
Pros: No sewing required, fastest method for accessible webbing ends, the replacement looks and functions exactly like the original, and you can do it in the field with a multi-tool.
Cons: Only works on un-sewn strap ends, frayed webbing can make threading difficult, and you must be comfortable trimming and melting nylon webbing.
Method 6: The Sewn Replacement for Permanent Repair
A sewn replacement gives you the strongest, most durable fix that matches the original factory construction. This method works for any buckle location, including hip belts and shoulder straps where the webbing is stitched directly into the pack body.
Start by using a seam ripper to carefully remove the stitches holding the broken buckle in place. Work slowly. The webbing underneath has existing needle holes that can tear if you pull too hard.
Once the old buckle is free, thread the new buckle onto the webbing exactly as the original was oriented. Double check the direction before you sew. An upside-down buckle is a frustrating mistake.
Use a heavy polyester thread like Gutermann MARA 50 or MARA 70. Polyester thread resists UV damage and stays strong when wet. Hand sew using a backstitch pattern along the original stitch line.
Make at least three parallel rows of stitching to create a secure bar tack. If you have a sewing machine, use a narrow zigzag stitch set to a short stitch length.
For extra strength, apply a thin coat of seam grip over the finished stitches. This prevents thread abrasion and adds a bit of water resistance to the repair.
Pros: Maximum strength equal to the original factory stitching, works for every buckle location on the pack, the repair looks professional, and it will last for years.
Cons: Requires sewing skill and tools, takes 30 to 60 minutes, you can damage the webbing if you rush the seam ripping step, and you need access to a needle and thread.
How to Choose Between Nylon and POM Plastic Buckles
Not all plastic buckles are created equal. Your replacement buckle’s material affects how it performs in different conditions. Understanding the difference helps you pick a buckle that lasts longer than the original.
POM, short for polyoxymethylene, is the most common buckle material in outdoor gear. It offers high tensile strength and excellent resistance to abrasion. POM buckles hold their shape well under repeated clipping and unclipping cycles. They perform best in moderate temperatures. However, POM can become brittle in extreme cold, which is why buckles sometimes shatter on winter trips.
Nylon buckles offer superior cold weather performance. They remain flexible at temperatures well below freezing. Nylon also absorbs less impact shock, which makes it less likely to crack when dropped on rock. The trade-off is that nylon absorbs moisture over time and can swell slightly in very wet conditions.
If your original buckle broke during a cold weather hike, replace it with a nylon buckle. If it snapped under heavy tension during a summer trip, stick with POM but consider moving up to a heavier size class. Some heavy-duty buckles use glass fiber reinforced nylon for the best of both worlds, combining cold flexibility with extreme tensile strength.
Pros of matching material to conditions: Longer buckle life, fewer trail failures, and better performance in your typical hiking environment.
Cons of ignoring material choice: You may replace a cold-shattered POM buckle with another POM buckle and face the same failure next winter.
What to Pack in Your Trail Repair Kit
Every hiker should carry a small repair kit. It adds less than two ounces to your pack weight and can save an entire trip. A broken buckle on day one of a weeklong trek becomes a minor annoyance instead of a trip-ending disaster.
Start with two spare side release buckles that match your pack’s most common webbing size. Include one male end and one female end. Add four heavy-duty zip ties in a six-inch length.
Wrap two feet of duct tape around a lighter or your trekking pole for compact storage. Include a small tube of super glue and a tiny packet of baking soda folded into a piece of paper.
A multi-tool with pliers and a knife handles most cutting and gripping tasks. Add a sewing needle pre-threaded with heavy polyester thread and taped to a piece of cardboard. A one-inch piece of seam grip in a sealed straw makes a great lightweight adhesive for fabric and seam repairs.
Pack everything into a small zippered pouch and store it in your pack’s brain pocket or hip belt pocket where you can reach it quickly. Check the kit before every trip. Replace anything you used on the last adventure.
Pros of carrying a repair kit: Fix problems immediately on the trail, help fellow hikers who break their gear, small weight penalty for huge peace of mind.
Cons of skipping this: A five-dollar broken buckle can end a trip that cost you hundreds in travel and permits.
Common Mistakes That Cause Buckles to Break
Understanding why buckles fail helps you prevent future breaks. The most common cause is stepping on a buckle that is lying on the ground. When you drop your pack and the waist belt buckle lands face down on a rock, your body weight crushes the plastic instantly. Always drape hip belts over the pack body when setting your pack down.
Cold weather is the second biggest culprit. Plastic loses flexibility as temperatures drop. A buckle that bends easily at room temperature may snap like glass at minus ten degrees. Warm the buckle with your hands before clipping it in freezing conditions. Avoid yanking hard on frozen straps.
UV exposure degrades plastic over time. A pack that lives in the back of a car or sits on a sunny porch for years develops brittle, faded buckles. Store your pack in a closet or gear bin away from direct sunlight.
Overloading is another factor. A hip belt buckle on a 40-liter pack handles moderate loads. The same buckle on a 70-liter expedition pack carrying 50 pounds faces constant stress that leads to fatigue failure. Make sure your pack fits properly so the weight transfers to your hips through the padded belt, not through the buckle itself.
Pros of preventing breaks: Less time repairing gear, less money spent on replacements, more confidence on remote trips.
Cons of ignoring these causes: Repeated buckle failures in the same location, frustration on the trail, potential injury if a buckle fails during a scramble or river crossing.
How to Replace a Hip Belt Buckle Step by Step
The hip belt buckle takes the most abuse on any pack. Here is a detailed replacement walkthrough using the sewing method for a permanent fix.
Start by examining how the original buckle is attached. Most hip belt buckles have the webbing sewn into a loop that passes through the buckle and then back into the padded belt. Look for the bartack stitches, which are dense zigzag stitches that look like a thick bar across the webbing.
Use your seam ripper to gently cut these bartack stitches. Insert the pointed tip under one stitch and push forward. The sharp inner curve slices the thread. Remove all stitching that holds the webbing loop closed. Slide the broken buckle off the freed webbing.
Thread the replacement buckle onto the webbing. For a side release buckle, the female end usually goes on the left hip belt wing and the male end on the right. Check your pack’s original setup and copy it. Position the buckle so the release tabs face outward for easy access.
Fold the webbing back into its original position and sew a new bartack. If sewing by hand, make four to five passes with heavy thread through the same stitch line. Pull each stitch tight. Knot the thread securely on the back side and trim the tail. Test the buckle by pulling hard before loading the pack.
Pros: Professional quality repair, same strength as original, no future worries about that buckle location.
Cons: Takes 30 minutes or more, requires careful seam ripping, and you risk damaging the webbing if you rush.
How to Prevent Webbing Fray After a Buckle Replacement
Nylon webbing frays aggressively once cut. Every time you trim a strap end during a buckle replacement, you create a potential fray point that can unravel over weeks of use. Stop this problem immediately.
The best method is to singe the cut end with a lighter. Hold the flame just below the webbing edge. Do not touch the flame to the nylon. Let the heat melt the fibers into a clean, sealed edge.
Move the flame back and forth along the entire cut surface. The webbing will darken slightly and form a hard lip. Let it cool for ten seconds before touching it. The melted edge is permanent and will never fray.
If you cannot use a flame, apply a thin coat of clear seam grip or Fray Check liquid to the cut edge. These products soak into the fibers and glue them together. Let the sealant dry completely before threading the webbing through a buckle.
Some hikers fold the very end of the webbing back on itself and sew a small hem. This creates a double-thick stopper that prevents the buckle from sliding off and also seals the cut edge inside the fold. This method works well for strap ends that you will never need to unthread again.
Pros of sealing webbing ends: Prevents unraveling, extends the life of your straps, and keeps the pack looking clean.
Cons of skipping this step: Frayed webbing becomes impossible to thread through buckles, the strap loses length as it frays, and eventually the buckle slips off entirely.
FAQs
Can I use super glue alone to fix a broken buckle?
Super glue alone rarely works for load-bearing buckles. The glue creates a rigid joint that cracks when the buckle flexes. Adding baking soda improves the bond strength, but even then, the repair is temporary. Use glue fixes to finish your hike, then replace the buckle properly at home.
What if I cannot find an exact match for my buckle size?
Measure your webbing width and buy any buckle with the same interior slot measurement. The exterior shape may differ, but the function will be identical. A 25 mm side release buckle from one brand works the same as a 25 mm buckle from another brand. The webbing fit is the only critical dimension.
How do I replace a buckle that is sewn into a closed loop without cutting the webbing?
Use a field repair buckle. These two-piece buckles snap together around the existing webbing loop. You break off the old buckle, snap the new one in place around the loop, and you are done. No sewing, no cutting, no webbing damage.
Can I use metal buckles instead of plastic ones?
Yes. Metal side release buckles and ladder locks exist and offer superior durability. However, metal buckles weigh more, can corrode in saltwater environments, and may feel cold against your skin in winter. They work great for dog chewed buckles or extremely heavy loads where plastic fails repeatedly.
My ladder lock buckle slips under load after replacement. What went wrong?
The replacement buckle may have a slightly larger interior clearance that does not grip your webbing properly. Try weaving the webbing through the buckle in a slightly different pattern. Add a second pass through the middle bar for more friction. If the problem persists, switch to a toothed ladder lock buckle, which has small teeth that bite into the webbing for extra grip.
How long does a sewn buckle repair last?
A properly sewn replacement using polyester thread and a bartack stitch pattern lasts as long as the original factory stitching. Many repaired buckles outlast the pack itself because the replacement plastic is newer and less UV-damaged than the rest of the hardware.

Hi, I’m Luna Beck — the founder and voice behind Urban Pack Vault. I’m passionate about helping people find bags that perfectly match their lifestyle. From backpacks to travel luggage, I research, review, and recommend so you never have to second-guess your next purchase.