How To Adjust Load Lifter Straps On A Backpack?
Your shoulders ache. Your pack pulls backward. Every step feels heavier than it should. Most hikers blame the weight, but the real problem often sits at the top of your shoulder straps.
Two small straps called load lifters control how your pack sits against your body. When you set them right, your backpack feels lighter and your posture stays upright. When you ignore them, you carry the load in the worst possible way.
Many people own great backpacks but never touch these straps. They miss out on real comfort. The good news is simple. Load lifters are easy to find, easy to reach, and easy to adjust.
In A Nutshell:
- Load lifters connect the top of your shoulder straps to the upper body of the pack. Their job is to pull the top of the load closer to your back so the weight stays balanced over your hips.
- Adjust your pack in the correct order. First the hip belt, then the shoulder straps, then the load lifters, and finally the sternum strap. Skipping this order ruins the fit.
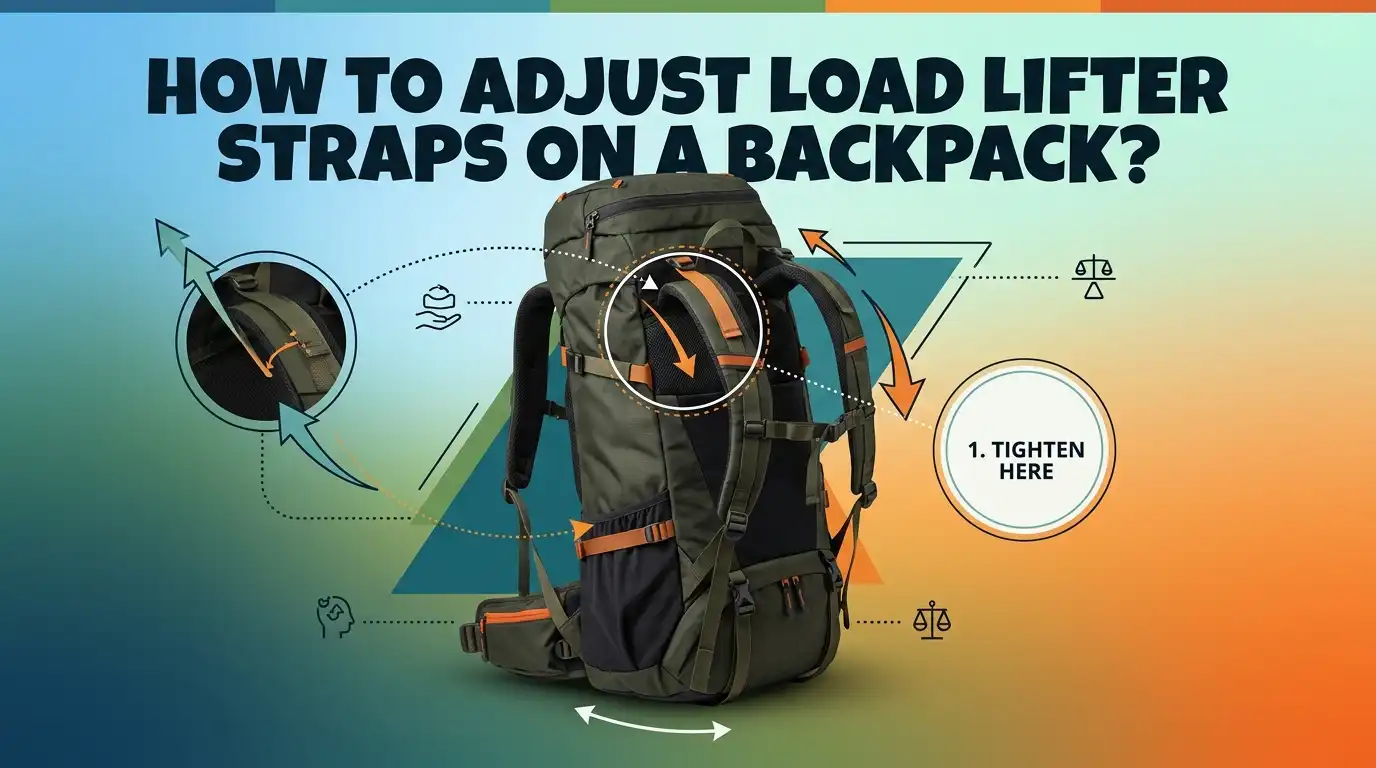
- Aim for a 30 to 45 degree angle on the load lifter straps. This angle gives the best pull without lifting the shoulder straps off your body.
- Gentle tension wins. Tighten only until you feel the top of the pack draw closer. Over tightening creates new pain and pulls the harness off your shoulders.
- Load lifters work best on packs over 30 liters with an internal frame. Small daypacks rarely need them or may not have them at all.
- Keep adjusting on the move. Loosen the straps on steep climbs and snug them on flat ground or descents. Small tweaks keep you comfortable all day.
What Are Load Lifter Straps On A Backpack?
Load lifter straps are the two thin straps that sit at the very top of your shoulder straps. They run from the top of each shoulder strap back to the upper part of the pack body or frame.
You will see them angle upward and backward in a short diagonal line. Their main job is to pull the top of the pack toward your upper back.
This pull does something important. It stops the heavy top of your pack from sagging away from your body. When the load stays close, your spine carries it in a straight, balanced line.
A pack that leans backward drags on your shoulders and forces you to lean forward. That posture tires you fast. Load lifters fix this by keeping the weight centered over your hips, where your strongest muscles do the work.
Why Adjusting Load Lifter Straps Matters For Comfort
Many hikers feel pain and never know the cause. They tighten the shoulder straps harder, hoping for relief, but the pain only grows. The hidden reason is often loose or wrongly set load lifters.
A pack that pulls backward shifts weight onto your shoulders and neck. Those areas are not built to carry heavy loads for hours.
When you set load lifters correctly, the magic happens. The weight transfers down to your hips and pelvis, which handle heavy loads far better than your shoulders. You stand taller.
You breathe easier. Your balance improves on rocky ground. Good load lifter tension can make a 40 pound pack feel noticeably lighter. This single adjustment often turns a miserable hike into a pleasant one, with no change to the actual weight you carry.
How To Find The Load Lifter Straps On Your Pack
Before you adjust anything, you need to locate the right straps. People often confuse load lifters with other straps and tighten the wrong ones.
The fix is simple once you know where to look. Put your pack on a table or on your back, then reach to the top of your shoulder straps.
Follow the shoulder strap upward until it meets your shoulder. Just above that point, you will find a short strap that angles back toward the pack body. That short diagonal strap is the load lifter. It usually has a small buckle or a pull tab.
Each side has one, so you have a left and a right load lifter. Do not confuse them with the sternum strap, which crosses your chest, or the hip belt straps near your waist. Once you spot the diagonal angle, you will recognize them every time.
The Correct Order To Adjust Your Backpack Straps
Order matters more than most people think. If you tighten load lifters first, the rest of your fit falls apart. The straps work as a team, so you must set them in the right sequence. Start by loosening every strap on the pack. This gives you a clean base to build from.
Next, follow this order. First, tighten the hip belt so it sits on top of your hip bones. Second, snug the shoulder straps until they hug your shoulders without lifting weight off your hips.
Third, adjust the load lifters. Fourth, clip and set the sternum strap. This sequence puts the weight on your hips first, then fine tunes the upper fit. When you follow this path, the load lifters do their real job instead of fighting against a bad base setup.
Step By Step: How To Adjust Load Lifter Straps Correctly
Now for the main task. Load your pack with real weight first, because an empty pack hides fit problems. Put the pack on and complete the hip belt and shoulder strap steps from the previous section. Only then should you touch the load lifters.
Follow these steps:
- Loosen both load lifters fully so they hang slack.
- Pull each load lifter strap forward and down with a slow, steady motion.
- Stop the moment you feel the top of the pack draw closer to your upper back.
- Check that the shoulder straps still rest flat on your shoulders. They should not lift off.
- Tighten both sides evenly so the pack sits straight.
The goal is a gentle pull, not a hard yank. You want the top of the pack to kiss your back, not to crush your shoulders. Test the fit by walking a few steps and adjust if needed.
Understanding The Ideal 30 To 45 Degree Angle
The angle of your load lifter straps tells you a lot about your fit. Experts agree that a 30 to 45 degree angle works best for most packs. Picture the strap running from your shoulder strap up to the pack body. That line should slope upward and backward at roughly that range.
Here is why the angle matters. A strap that runs flat or sags downward cannot pull the load inward, so it does almost nothing. A strap that points too steeply upward usually means the pack frame is too tall for your torso.
When you see a clean 30 to 45 degree line, you know the pack size matches your body. You can eyeball this angle in a mirror or ask a friend to check from the side. If your angle looks wrong even after adjusting, the pack may not fit your torso length.
Signs Your Load Lifters Are Too Tight
Tighter is not better with load lifters. Many hikers overtighten them and create brand new problems. Your body sends clear signals when this happens, so learn to read them.
Watch for these signs. The shoulder straps lift away from your shoulders and create a gap at the top. This is the most common red flag.
You may also feel pinching near your armpits or across your collarbones. Some people notice neck tension because the straps pull the harness upward and forward. An overtightened load lifter also makes you feel unstable, because it shifts weight back onto your shoulders instead of your hips.
If you spot any of these, loosen the straps a little at a time until the shoulder straps lie flat again and the pinching stops.
Signs Your Load Lifters Are Too Loose
Loose load lifters cause the opposite trouble. When the straps hang slack, the top of your pack pulls away from your body. This creates a backward drag that grows worse with every mile. Your body fights this pull all day long.
Look for these clues. You lean forward to balance the pack, which strains your lower back. The top of the pack sways or bounces as you walk. You feel more weight pressing down on your shoulders than on your hips.
A wobbly, top heavy feeling on uneven ground is another strong sign. If you notice these issues, snug the load lifters gradually until the top of the pack settles against your upper back.
Stop as soon as the sway disappears and the pack feels stable. The right tension sits between too loose and too tight.
When You Actually Need Load Lifter Straps
Not every pack needs load lifters, and not every situation calls for them. They matter most on larger packs with an internal frame. Packs over 30 liters that carry real weight benefit the most, because they have a tall load that wants to tip backward.
Here is a quick breakdown:
- Large backpacking packs (40 liters and up): Load lifters are very useful and often essential for comfort on long trips.
- Mid size packs (30 to 40 liters): Helpful when loaded heavy, less important when light.
- Small daypacks (under 25 liters): Often skip them entirely, since the short frame gains little from the pull.
Frameless ultralight packs are a special case. On those, load lifters can distort the soft top of the pack instead of transferring weight. So check your pack type before you rely on them.
Common Load Lifter Mistakes And How To Fix Them
People repeat the same mistakes with load lifters again and again. Knowing them in advance saves you from pain on the trail. The biggest error is adjusting load lifters before setting the hip belt and shoulder straps. Fix this by always following the correct order.
Other frequent mistakes include the following. Cranking the straps as tight as possible in the belief that tighter equals more support. The fix is gentle tension only.
Setting one side tighter than the other, which makes the pack lean and throws off your balance. The fix is to tighten both sides evenly and check in a mirror.
Some hikers also forget to readjust after they add or remove gear. Any weight change shifts your fit, so a quick re tweak after packing keeps you comfortable. Avoid these traps and your pack will reward you.
How To Readjust Load Lifters While Hiking
Your perfect setting at the trailhead will not stay perfect all day. Terrain, fatigue, and weight changes all affect your fit. Smart hikers tweak their load lifters on the move, and you can too. The adjustment takes only a few seconds.
Use these simple rules:
- On steep uphill climbs, loosen the load lifters slightly. This lets you lean forward and breathe easier without the pack pulling your shoulders back.
- On flat ground and descents, snug them back up. This keeps the load tight against your back for better balance.
- After every break, check the tension, since your body relaxes when you stop.
Pros And Cons of frequent on trail adjustment: the upside is steady comfort and better balance across changing terrain. The downside is that constant fiddling can distract you, and some hikers prefer to set it once and forget it. Find the rhythm that suits your style.
Pros And Cons Of Using Load Lifter Straps
Load lifters help most hikers, but they are not magic for every situation. A balanced view helps you use them wisely. Below is a clear look at both sides so you can decide how much to rely on them.
Pros:
- They pull the load close to your back and improve your balance.
- They shift weight from your shoulders down to your stronger hips.
- They let you fine tune comfort on different terrain in seconds.
- They reduce backward drag and help you stand taller with less fatigue.
Cons:
- They do little or nothing on small daypacks and frameless packs.
- Overtightening creates new pain and lifts the harness off your shoulders.
- They cannot fix a pack that is the wrong torso size for your body.
- They add one more step to learn and manage.
Used with care, the pros clearly outweigh the cons for most loaded packs.
Final Tips For A Comfortable Backpack Fit
A great fit comes from practice, not luck. Spend a few minutes at home with a loaded pack before any big trip. Walk around your house, climb stairs, and feel how the load sits. This dry run helps you spot problems before they ruin a hike.
Keep these final tips in mind. Always set the hip belt first, since your hips carry most of the weight. Check your load lifter angle in a mirror to confirm that 30 to 45 degree slope.
Make small changes rather than big ones, because a tiny tweak often solves a big discomfort. Listen to your body throughout the day and adjust as needed.
If pain continues even after careful setup, your pack torso length may not match your frame. In that case, a proper fitting can make all the difference. With these habits, your backpack will feel balanced and comfortable on every trail.
Frequently Asked Questions
What is the main purpose of load lifter straps?
Load lifter straps pull the top of your pack closer to your upper back. This keeps the weight balanced over your hips instead of dragging on your shoulders. The result is better posture, improved balance, and a pack that feels lighter than its actual weight.
Should load lifter straps be tight or loose?
They should be snug but gentle, never cranked hard. Tighten only until the top of the pack draws close to your back. If your shoulder straps lift off your shoulders or you feel pinching, you have gone too tight. Loosen them a little until the harness rests flat again.
What angle should load lifter straps be at?
Aim for a 30 to 45 degree angle between the shoulder strap and the pack body. This slope gives the best inward pull without lifting the harness. If you cannot reach this angle even after adjusting, your pack torso length may be wrong for your body.
Do all backpacks have load lifter straps?
No. Larger framed packs over 30 liters usually have them, while small daypacks often do not. Frameless ultralight packs may have them, but the soft body limits how well they work. Check the top of your shoulder straps to see if your pack includes them.
In what order should I adjust my backpack straps?
Follow this order for the best fit. First the hip belt, then the shoulder straps, then the load lifters, and finally the sternum strap. This sequence places the weight on your hips first, then fine tunes the upper fit. Adjusting load lifters out of order leads to a poor, uncomfortable setup.
How often should I adjust load lifters on a hike?
Adjust them whenever the terrain changes. Loosen them on steep climbs and snug them on flat ground or descents. It also helps to recheck the tension after every break, since your body relaxes when you stop walking. Small, frequent tweaks keep you comfortable all day.

Hi, I’m Luna Beck — the founder and voice behind Urban Pack Vault. I’m passionate about helping people find bags that perfectly match their lifestyle. From backpacks to travel luggage, I research, review, and recommend so you never have to second-guess your next purchase.