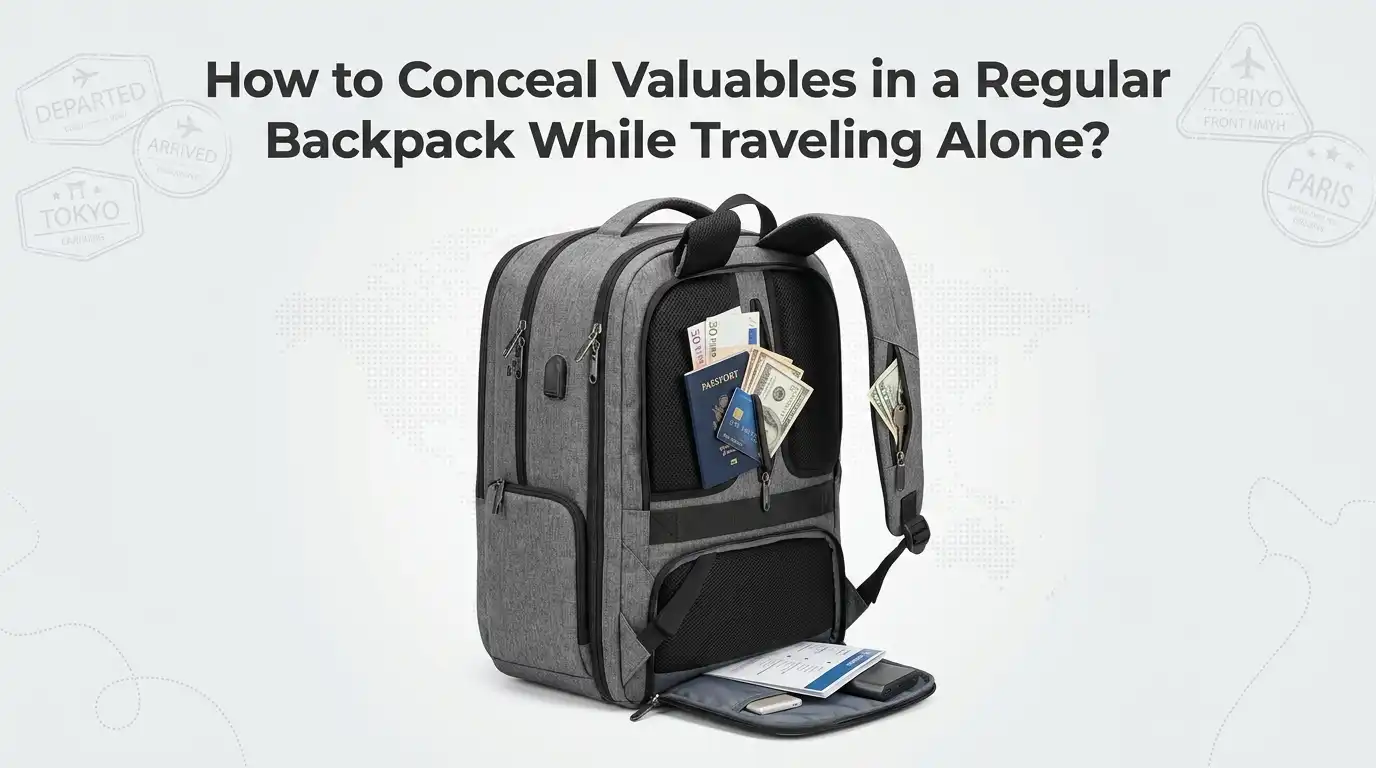
How to Conceal Valuables in a Regular Backpack While Traveling Alone?
Traveling alone feels freeing. You move at your own pace. You choose your route. You stop where you want. But solo travel also means you are the only person watching your bag, your phone, your passport, and your money.
That is why hiding valuables in a regular backpack matters. You do not need a flashy travel bag or special gear to stay safer.
You need a calm plan, smart placement, and habits that make your backpack look boring and hard to read. A thief usually wants speed. A messy, normal looking bag with layered storage often slows that down.
In a Nutshell
- Do not keep all valuables in one spot. This is the biggest rule. Split your cash, cards, passport copy, phone backup cable, and key items into separate places. If one spot fails, your whole trip does not fail. Small losses are easier to handle than total losses.
- Make your backpack look normal and low value. A plain bag often draws less attention than a shiny travel pack full of brand tags. Keep the outside simple. Avoid clipping expensive gear where people can see it. A basic backpack can work very well if the inside is layered with smart storage.
- Use deep storage and quick access storage. Deep storage holds items you rarely touch, like extra cash or a backup card. Quick access storage holds the small amount you need that day. This keeps you from opening your most important stash in public. Less public searching means less risk.
- Hide items inside everyday objects. A soft glasses pouch, pencil case, laundry bag, snack bag, or rolled shirt can hide valuables without looking special. Pros: these items look dull and natural. Cons: you must remember where you put everything or you may confuse yourself.
- Prepare for the moments when theft often happens. Busy stations, airport lines, hostel check in, buses, and cafes create distraction. Many thefts happen when people pay, look at a screen, or set a bag down for one minute. Build a routine for these moments before your trip starts.
- Have a recovery plan before anything goes wrong. Save digital copies of documents. Keep emergency cash apart from your main wallet. Know how to lock your phone, freeze cards, and contact your bank. Hidden valuables help, but backup plans save the day.
Start with the right goal, not the perfect hiding spot
Your goal is not to create a secret movie style backpack. Your goal is to make theft harder, slower, and less rewarding. A regular backpack works well because it looks ordinary. That alone helps.
Think in layers. One layer hides items from quick eyes. Another layer separates items so one mistake does not cost everything. A final layer helps you recover if something is lost. This system works better than one clever trick.
Pros: a layered plan is cheap, easy, and flexible. It works in airports, buses, hostels, and city streets.
Cons: it takes discipline. You must keep the same routine every day.
Also keep the plan legal and simple. Do not hide items in a way that causes trouble at security checks. The best concealment method is one that still lets you pack, move, and answer questions without stress.
Use deep storage and quick access zones inside the bag
Divide your backpack into two clear zones. The first zone is deep storage. This holds your backup cash, spare card, passport, and other items you should not touch often. The second zone is quick access. This holds your daily cash, transit card, tissues, charger, and other small items.
This setup changes how you act in public. You stop digging through the whole bag at a cafe or bus stop. You open one easy pocket, take what you need, and close it fast. That keeps your important stash private.
Pros: this method reduces exposure and helps you stay organized.
Cons: if you mix the zones after a long day, the system breaks.
A good rule is simple. If you need it more than once that day, keep it in quick access. If losing it would ruin your trip, keep it in deep storage.
Split valuables into three groups before you leave home
Do not pack valuables as one bundle. Split them into three groups. Group one is your daily use items. Group two is your backup items. Group three is your emergency only items.
Daily use can include one bank card, a little cash, and your active phone cable. Backup can include a second card, more cash, and a document copy. Emergency only can include reserve cash in a hidden pouch and a second copy of key details stored elsewhere.
Pros: this method limits damage after theft, loss, or a rushed mistake.
Cons: you must track more than one storage point.
This method works well for solo travelers because there is no partner to share risk with. Your bag must do that job. Separation creates safety. One stolen pocket should never erase your money, identity, and communication all at once.
Hide valuables inside boring containers, not obvious travel pouches
A thief often looks for wallet shapes, passport sleeves, or branded tech cases. That is why dull containers work so well. Put cash inside a folded sock in a packing cube. Put a spare card in a plain envelope inside a notebook sleeve. Use a soft glasses case, pencil pouch, or small laundry bag for backup items.
These objects blend in because they look normal. They also avoid the look of a special valuables pouch. Boring wins.
Pros: cheap, easy, and hard to spot in a quick search.
Cons: too many boring containers can confuse you if you do not label them in your mind.
Choose only two or three decoy containers. Keep your method consistent. If your spare cash always lives inside the same soft pouch, you will find it fast without turning your bag inside out.
Build a simple false bottom with clothing
A false bottom sounds fancy, but it can be simple. Place a flat pouch with backup cash or documents near the bottom of the main compartment. Then cover it with a folded shirt, light sweater, or packing cube. Above that, place normal items like snacks, a book, or a toiletry bag.
This creates a soft barrier. A quick hand inside the bag meets ordinary travel stuff first. The hidden pouch stays lower and flatter. The goal is delay, not magic invisibility.
Pros: low cost, easy to build, and useful in any regular backpack.
Cons: it slows your own access too, so it is poor for items you need often.
Use this method for emergency cash, copies of documents, or a spare card. Do not use it for your main phone or daily wallet. Those need faster and safer access.
Add hidden inner pockets or clip in small pouches
Many regular backpacks have inside seams, laptop sleeves, or lining gaps that can hold a slim pouch. You can also clip a small zipper pouch to an inside loop or key hook. If your bag has no clip point, sew a simple fabric loop by hand or use a small safety pin inside the lining area.
This keeps key items from sliding loose in the main compartment. It also hides them from a fast grab. A clipped pouch stays put even if the bag tips over. That control matters in crowded spaces.
Pros: better structure and less shifting inside the bag.
Cons: if the pouch is bulky, it can become obvious.
Keep the pouch flat. Use it for a backup card, folded bills, or a document copy. Avoid putting too many hard items in one hidden pouch because the shape can give it away.
Protect cash, cards, and passport with separate rules
Cash, cards, and passport should not live together all day. Keep small daily cash in quick access. Keep your main card in a separate place. Keep your passport in deep storage, or in a secure accommodation safe if you truly do not need to carry it.
A passport is thin, flat, and easy to hide in a document sleeve between papers or inside a laptop sleeve. Spare cash can sit in a sealed envelope inside clothing. A backup card can live in a slim hidden pouch.
Pros: this lowers the chance of one theft becoming a full identity crisis.
Cons: you need a simple mental map so you do not forget what sits where.
Never reveal your whole stash while paying. Many thefts happen during distraction. Show only the small amount you plan to spend. Keep the rest unseen.
Handle phones, earbuds, and chargers with less risk
Tech items create two problems. They are valuable, and people touch them often. That makes them easy to expose. Keep your phone in your hand only when you need it. Return it to the same place every time. Store earbuds and power banks in a plain pouch that looks cheap and common.
Chargers can help hide other items too. A spare card or folded note can sit in the same dull cable pouch, but do not overpack it. You still need quick access without stress.
Pros: this method keeps tech tidy and less visible.
Cons: if the pouch becomes your one tech center, it may become too important.
Do not place your phone on counters while paying. Some official travel advice warns that phones, wallets, and purses are often stolen during short distracted moments. Your hand or closed bag is safer than a flat surface.
Use decoy items, but keep them simple
A decoy wallet or small amount of visible cash can help in some cases. The idea is simple. Keep a little daily money in an easy place and keep your true backup elsewhere. If you lose the easy place, the trip still continues.
This method works best with a small daily wallet, transit card, and modest cash amount. It should look real because it is real. It just should not hold everything. Think useful decoy, not fake prop.
Pros: fast for normal spending and safer for daily movement.
Cons: if you make the decoy too good, you may end up loading it with too much value.
Set a clear limit. Carry only what you expect to spend that day. Refill it in private, not on the street. That habit protects the deeper stash and keeps your routine calm.
Pack for airports, buses, and train stations before you arrive
Transit points create stress, lines, noise, and split attention. That is why your backpack setup should already be done before you reach the airport or station. Put liquids, tissues, and charging gear where you can reach them without exposing deeper storage.
Use one document spot for tickets and one separate spot for passport or backup cash. During long rides, keep the bag in contact with your body or within arm reach. If it goes overhead, place valuables in an inner pouch first.
Pros: less fumbling, faster movement, and fewer public bag openings.
Cons: you must repack after each travel day to restore order.
Your worst moment is often a rushed moment. Good prep reduces that risk. A calm bag helps a solo traveler look confident, and confidence often reduces attention from opportunistic thieves.
Stay smart during hostel and hotel routines
Accommodation is where many travelers relax too early. They shower, charge devices, repack, and leave things spread out. That is the exact time to stay structured. If your room has a safe that only you control, place the most important items there. If not, avoid keeping all valuables in one place.
Keep one set of items on you, one set deep in the backpack, and one set in a secure room spot if available. Use your hidden pouch for sleep if the setting feels uncertain. Keep your bag zipped even inside the room.
Pros: this reduces risk during cleaning, check in, and shared room traffic.
Cons: too many storage spots inside a room can cause forgetfulness.
Solo travel rewards routine. Each night, reset the same storage plan. Each morning, check the same three items first: phone, money, documents.
Have a recovery plan for loss, theft, or panic
Even the best hiding system can fail. That is why recovery matters. Save digital copies of your passport, insurance, bookings, and card contacts. Keep one paper note with emergency numbers in a hidden pouch. Know how to lock your phone and freeze cards fast.
If something goes missing, pause first. Many items are misplaced, not stolen. Check your fixed storage points in order. Then block cards, secure your phone, and report theft if needed. Travel advice from official sources also stresses police reports for insurance claims and replacement steps.
Pros: a recovery plan cuts panic and speeds action.
Cons: it takes a little setup before the trip.
Hidden valuables buy time. Backup systems save the trip. Both matter. If you prepare both, one bad moment does not control the rest of your journey.
Avoid the mistakes that make concealment fail
Most backpack safety problems come from habits, not from the bag itself. People open their main stash in public. They carry all valuables together. They leave phones on counters. They trust a backpack because it has many zippers, then forget that they keep showing the same pocket to strangers.
Another common mistake is overhiding. If your system is too clever, you may forget it under stress. Keep the plan simple enough to use while tired, rushed, or jet lagged. Simple systems survive real travel days.
Pros of a simple plan: easy recall, less stress, faster recovery.
Cons: it may feel less clever, but clever is not the goal.
A good concealment system should be boring, repeatable, and easy to check in ten seconds. If it does that, it is strong enough for solo travel.
FAQs
Is a regular backpack safe enough for solo travel?
Yes, if you use layered storage, keep the outside plain, and avoid showing your main stash in public. A normal bag often attracts less attention than a special looking travel bag.
Should I carry my passport all day?
Carry it only if local rules or your plans require it. If you must carry it, keep it in deep storage, not in the same place as your daily cash.
What is the safest place for emergency cash?
A flat hidden pouch, inner sleeve, or soft false bottom works well. Keep it separate from your main wallet and only access it in private.
Is a decoy wallet a good idea?
Yes, if it holds only a small daily amount. It helps with quick spending and reduces exposure of your backup cash and cards.

Hi, I’m Luna Beck — the founder and voice behind Urban Pack Vault. I’m passionate about helping people find bags that perfectly match their lifestyle. From backpacks to travel luggage, I research, review, and recommend so you never have to second-guess your next purchase.